Effective Ways to Screenshot on Keyboard in 2025
Understanding Keyboard Screenshot Options
When looking to take a screenshot on your keyboard, understanding the diverse keyboard screenshot options available can enhance your user experience. Whether you are running Windows or Mac OS, each operating system comes equipped with its unique shortcut keys designed to capture your screen quickly. For example, on Windows machines, pressing the Print Screen key (often abbreviated as PrtScn) allows you to capture the entire screen. If you wish to capture only the active window, you can use the Alt + Print Screen combination. Meanwhile, Mac users can utilize command shortcuts like Command + Shift + 3 for a full screenshot, or Command + Shift + 4 for selecting an area. Understanding these basic commands is essential for optimizing your ability to capture visual content efficiently.
Windows Screenshot Key Techniques
For those often operating on Windows, mastering the Windows screenshot key can greatly improve your workflow. The Windows + Print Screen shortcut captures your entire desktop and automatically saves it to the “Screenshots” folder in your “Pictures.” This feature eliminates the extra step of pasting the image elsewhere. Additionally, users can employ tools such as Snipping Tool or Snip & Sketch for more detailed capturing options. These utilities allow you to grab screenshots with varying shapes and sizes, making it easier to document and share only the relevant sections of your screen. Incorporating these screenshot tools keyboard methods into your digital routine can save time and enhance productivity seamlessly.
Mac Keyboard Screenshot Techniques
For Mac users, the Mac keyboard screenshot options also include several effective strategies. Besides the commands mentioned earlier, users can access the Screenshot app via the Command + Shift + 5 shortcut. This tool provides a menu with various capture options, including screen recording and customizable capture areas, all while showcasing ongoing screen capture features. By utilizing these distinct methods, Mac users can effortlessly take screenshots that fit their specific needs and preferences. Whether capturing an entire screen, a selected window, or a specific segment, mastering these methods ensures a comprehensive understanding of harnessing the screenshot functionality keyboard.
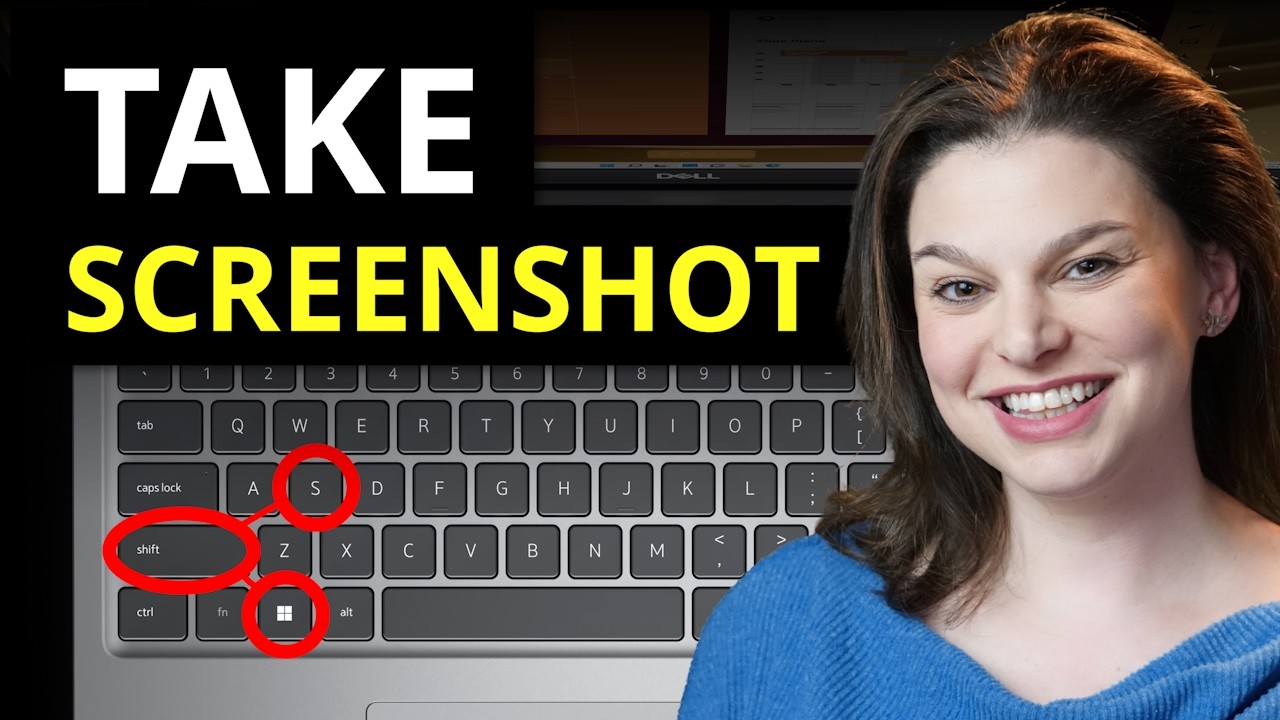
Quick Screenshot Keys for Efficient Capturing
Quick screenshot keys are indispensable for individuals looking to capture images rapidly without the need for cumbersome software. Mastering keyboard shortcuts facilitates an efficient workflow. For instance, using Windows key + Shift + S brings up a screen selection tool, allowing you to outline an area to capture directly. For users inclined towards expediency, investing time in learning these shortcuts pays off as they increase productivity and enable fluid multitasking. Remember that most modern keyboard layouts feature dedicated keys that streamline the capturing process, eliminating unnecessary hassle while allowing seamless visuals for documentation, sharing, or organizational purposes.
Best Screenshot Keys for Windows
For Windows users, default best screenshot keys blend ease of access and functionality. The classic Print Screen method can be shifted into effective multi-tasking with more keyboard combinations. For exotic techniques, explore combinations like Ctrl + Print Screen which captures what’s on your clipboard and saves it to any editing tool of choice. Alternatively, downloading third-party applications like Greenshot or Lightshot can augment the built-in capabilities, providing advanced features that streamline screen capturing, including automatic annotation and easily sustainable screenshots for ongoing projects.
Best Screenshot Keys for Mac
On the Mac, the best screenshot keys utilize the classic “Command” key format but allow unique styles of capturing based on user interactions. By configuring your settings under System Preferences, you can customize your screenshot keyboard shortcuts to match your workflow. This flexibility fosters greater productivity as users can create their shortcuts according to their needs—perhaps aligning them with frequently used applications or workflows. Conclusively, understanding these keyboard tools fosters familiarity with your operating system and optimizes your overall efficiency.
Advanced Screenshot Techniques on Various Devices
In today’s digital world, understanding various screenshot techniques for computers and devices helps users streamline their tasks. Advanced screenshot capabilities now extend beyond traditional methods, utilizing specialized applications designed for enhanced functionality. Options such as cloud storage upload directly after capturing allow instant transmission of visual content. Furthermore, enabling screenshot features built into productivity software ensures you capture material efficiently and seamlessly. The best practices evolve with technological advancement, and keeping up-to-date is essential in maintaining efficacy and organizing captured content.
Efficient Screenshot Keyboard Shortcuts
Following efficient methods enhances the screen capturing experience. Adopting comprehensive efficiency tips for screenshots can save time and keep a smooth workflow. For instance, using tools like Snagit can curate perfect visual documentation, providing options to instantly edit or annotate within the application. In many cases, integrating software that allows for direct uploads to cloud service providers can drastically increase holistically managing your captured content, like using an application that links directly to OneDrive or Dropbox. Each tactic not only optimizes technology but adapts modern work methodologies for practicality.
Collaboration and Screenshot Sharing Techniques
Sharing screenshots efficiently finds its norm in collaboration tools like Slack or Microsoft Teams. You can use keyboard shortcuts for taking screenshots directly and respond or share with colleagues without delay. Understanding how to convert captures into presentable formats, such as images or PDFs, adds depth to effectively communicating ideas. Utilizing features provided by these apps to integrate your screenshots also fosters a cohesive understanding among team members and renders screenshots as valuable information rather than isolated images.
Key Takeaways
- Understanding keyboard screenshot options on different devices is essential to effective digital practices.
- Leverage various quick screenshot keys for productive and swift screen captures.
- Familiarize yourself with advanced screenshot techniques for enhancing your productivity and collaborative efforts.
- Ensure your screenshot functionality keyboard is optimized with applications and settings applicable to your needs.
- Explore customized settings for screenshot commands that streamline your workflow and adapt to your tasks.
FAQ
1. What are the most commonly used keyboard shortcuts for screenshots?
The most widely utilized keyboard shortcuts for taking screenshots vary by operating system. On Windows, ‘Print Screen’, ‘Alt + Print Screen’, and ‘Windows + Shift + S’ are common examples. Mac users often use ‘Command + Shift + 3’ for full screens or ‘Command + Shift + 4’ for selection tools. Each of these keys streamlines the capturing process according to your preferences and requirements.
2. Is there a one-click solution for taking screenshots on laptops?
Yes, many laptops feature keyboard combinations such as ‘F12’ or ‘Fn + Print Screen’ that directly capture the current screen with a single press, depending on the device’s specific configuration. This solution helps expedite the process, making it convenient for users who require frequent captures without delving into complex methods.
3. Can screenshot tools on keyboards be customized?
Absolutely! Many operating systems allow for customization of screenshot settings keyboard through System Preferences or Control Panels. Users can adjust their shortcut keys, linking them to specific actions that enhance their productivity by aligning the screenshot capturing with their needs.
4. What are some third-party applications for advanced screenshot capabilities?
Some recommended third-party applications include Snagit, Lightshot, and Greenshot, which offer more features than built-in utilities. These programs allow for precise editing, instant sharing, and even predetermined capture areas, making them ideal for more extensive documentation or editing projects.
5. Are screenshots stored automatically after taking them?
On Windows, screenshots captured with the Windows + Print Screen combination are automatically saved to the “Screenshots” folder within “Pictures.” In contrast, Mac screenshots are saved to the desktop by default unless specified otherwise. However, some tools allow for configurable storage settings, perhaps directly to a cloud service.
6. How can screenshots help in collaboration?
Utilizing screenshots in collaboration can clarify discussions and provide visual examples of ideas, designs, and data. Captured screenshots can be shared instantly through collaboration tools like Slack or Teams to avoid misunderstandings and improve productivity by aligning everyone’s focus.