How to Take Professional Photos with iPhone
In today’s digital age, iPhone photography has revolutionized the way we capture moments and express our creativity. Ideal for both beginners and seasoned photographers, mastering the art of iPhone photography can yield astonishing results. This guide is tailored to explore essential tips and techniques for taking professional photos with an iPhone, including understanding camera features, utilizing light effectively, and editing your images to perfection.
Essential iPhone Photography Tips
Understanding the fundamentals of iPhone photography can transform your pictures from ordinary to extraordinary. Whether you’re a beginner or an experienced photographer, these tips will help you take sharp, vibrant, and visually appealing photos. Exploring the **best settings for iPhone photography**, such as adjusting exposure or utilizing the grid lines can greatly enhance the quality of your images. Remember, consistent practice mixed with experimentation will pave your way towards exceptional photography skills.
Understanding iPhone Camera Features
The iPhone boasts a wide array of camera features designed to optimize your photography experience. Key features include Portrait mode, which allows you to create stunning depth-of-field effects, and HDR (High Dynamic Range), which captures multiple exposures to deliver better detail in both bright and dark areas. For professional-quality images that convey depth, understanding how to use your **iPhone camera features** is crucial. Learning about **shooting in low light with iPhone** will also enable you to capture great images in various lighting conditions.
Using Natural Light for iPhone Photos
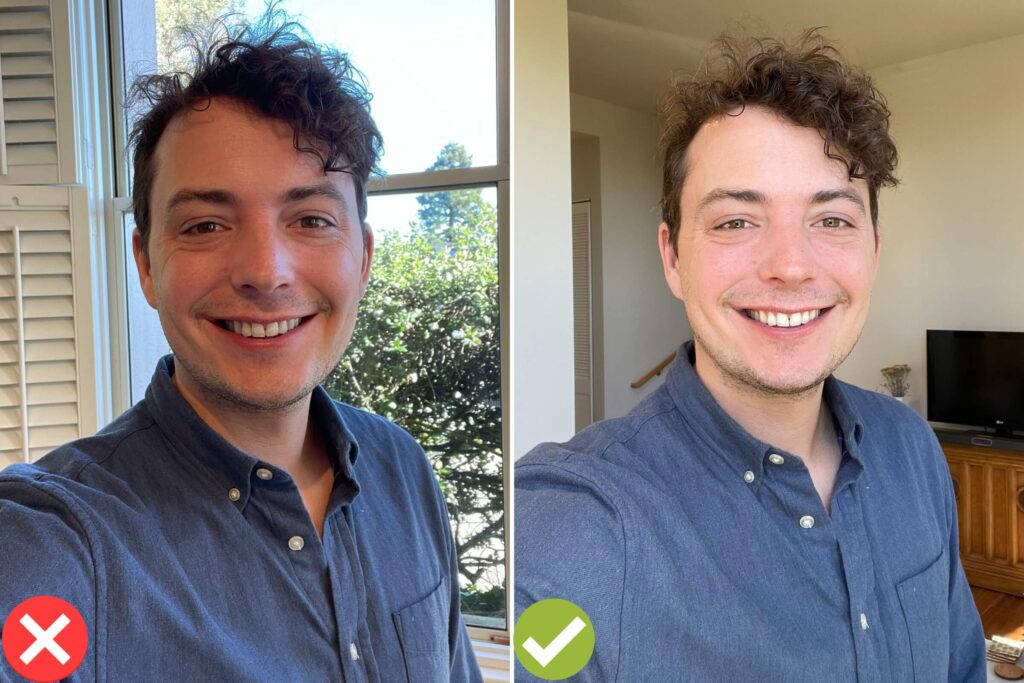
Natural light is a powerful tool in photography that can enhance the colors and textures in your images. **Shooting in natural light** not only provides flattering soft shadows but also adds a professionalism to your work. Positioning your subject near windows during the golden hour, when sunlight is warm and diffused, can create beautifully lit photos. Experiment with different angles and times of the day to leverage **lighting techniques for iPhone photography** that avoid strong shadows and glare.
Adjusting Exposure on the iPhone Camera
One of the most critical aspects of taking professional photos with iPhone is adjusting exposure. Often, your iPhone will automatically set a default exposure based on its scene analysis. However, manually tweaking this can lead to more dynamic and balanced images. To adjust, simply tap the screen, then slide your finger up or down. Understanding how to utilize these adjustment features can greatly improve your success in capturing vibrant photos. Low light scenarios especially benefit from these adjustments, making your images clearer and more colorful.
Composition Techniques for iPhone Photography
Creating visually appealing photographs involves mastering composition techniques. The rule of thirds is a fundamental concept that many photographers utilize in framing their shots. By dividing your frame into a 3×3 grid, your eye is naturally drawn to the intersecting lines where the interest points lie. Using **grid lines in the iPhone camera** not only helps balance the subject but can also highlight essential aspects of the image. Combining these techniques with knowledge of angles and perspectives can elevate your photos to a professional standard.
Utilizing the Rule of Thirds
The rule of thirds applies a simple yet highly effective technique for enhancing the composition of your photos. To implement this, enable grid lines in your iPhone camera settings. Place important elements of your composition along these lines or at their intersections. This approach often results in more engaging and balanced photographs. Remember to experiment and adapt this rule to your creative vision for greater impact.
Creative Angles in iPhone Photography
What often separates an average photo from a stunning one is the angle and perspective from which it’s shot. Various creative angles—such as low to the ground or high above head height—help add depth and interest to your images. Try different angles to convey a unique point of view, bringing new life to your subjects, especially when focusing on the **photographing food with iPhone** or landscape photography.
Tips for Shooting Close-Ups with iPhone
Shooting close-ups allows for capturing the smallest details, illustrating textures and colors beautifully. For **tips for shooting close-ups with iPhone**, consider using the iPhone’s **macro lens** feature or specialized smartphone attachments that enhance close-focusing capabilities. Ensure your camera is steady and use natural light wherever possible to truly make your subject pop, achieving that professional macro photography look!
Editing iPhone Photos for a Professional Touch
Editing plays a vital role in achieving polished images. Whether you’re making basic adjustments or diving deeper into creative edits, understanding effective methods can turn simple clicks into breathtaking visuals. Using various editing apps available on the App Store, such as Snapseed or Lightroom Mobile, allows great flexibility in refining photos to your tastes. The power of proper editing should not be underestimated, especially when enhancing aesthetic quality.
Using Filters and Editing Apps
While the iPhone camera captures stunning images, the use of filters and appropriate editing apps steadily enhances them. These tools allow you to adjust elements like brightness, contrast, and saturation. Many users find joy in experimenting with filters but must remember to apply them thoughtfully, as over-filtered images could detract from the true beauty of your subject. Take time to understand which filters best complement your style for **iPhone photography projects**.
Tips for Processing Photos on iPhone
Understanding **processing photos on iPhone** requires thorough knowledge of various settings. Usually, cropping unwanted details helps focus the viewer on what matters most, while adjusting shadows and highs can reveal hidden details, making your work pop. Always save a copy of the original picture in case further edits are needed or mistakes occur during the processing. Following structured steps ensures a systematic approach to refining your images.
Storytelling Through iPhone Photos
A photograph tells a story, and having clarity about this narrative can shape how you depict a scene. Consider what emotions and messages you wish to convey with your images, as this awareness will influence your photography techniques. Explore **capturing candid moments with iPhone**, where genuine emotions and stories unfold beautifully. Mixing elements of showing context with often under-appreciated details tells compelling stories without uttering a word.
Key Takeaways
- Utilizing natural light can significantly enhance iPhone photos.
- Master the basics of composition and the rule of thirds for professional-looking images.
- Understand your camera features and make adjustments to exposure and focus.
- Leverage editing apps for post-processing to refine your images.
- Tell a story with your photography by encapsulating emotions and context.
FAQ
1. What is the best time to take photos with an iPhone?
The best time to capture photos with an iPhone is during the golden hours—early morning and late afternoon. During these times, natural light is softer, providing a warm and flattering glow that enhances your images. Utilizing **lighting techniques for iPhone photography** during these hours will significantly improve the quality of both portraits and landscapes.
2. How can I shoot in low light with my iPhone?
Shooting in low light conditions can be challenging, but there are measures you can take. First, ensure you hold the iPhone steadier as any movement can ruin the shot. Experiment with **adjusting exposure in the iPhone camera** settings, and consider using Night mode which intelligently utilizes longer exposures to brighten images without adding noise. Exploring aperture settings can also help yield brighter results in low light situations.
3. What is the importance of composition rules in iPhone photography?
Composition rules, such as the rule of thirds, are crucial because they help visually structure your images, guiding the viewer’s eye to essential elements. Utilizing these rules enhances your ability to create visually appealing photographs, which is paramount in **iPhone photography for beginners**.
4. Can I edit my iPhone photos, and what apps are recommended?
Absolutely, editing iPhone photos is encouraged to unleash their full potential! Popular apps such as Snapseed and Lightroom Mobile offer versatile editing tools to adjust colors, brightness, sharpness, and more. Understanding how these apps work is vital in developing your own editing style while improving **iPhone photography quality**.
5. How can I capture action shots effectively with an iPhone?
To successfully capture action shots with your iPhone, utilize **shooting burst photos with iPhone**, allowing multiple frames to be taken in quick succession. Make sure to focus on the action before hitting the shutter to catch that perfect moment. Additionally, enabling HDR may enrich details in fast-moving scenes, giving a more dynamic representation of the action.
6. Should I use filter apps for iPhone photography?
Utilizing filter apps can be beneficial for creating unique styles, but moderation is key. Aim for filters that enhance rather than overwhelm the original quality of your photos. Experimenting with various filters from **editing apps for iPhone photos** can certainly serve to discover your personal aesthetic and improve your overall **iPhone photography** portfolio.
7. Can using accessories improve iPhone photography results?
Definitely! Accessories such as tripods, external lenses, and lighting options serve to enhance your photo quality immensely. For instance, using a tripod can deliver steadier shots, while macro lenses allow for stunning close-ups. With the right **iPhone photography accessories**, you can reach levels of quality formerly reserved for professional camera users.